

An American Attempts Foreign Recipes: Portuguese Pastéis de Nata 🇵🇹
Purchases made through some links on this page may provide The Detour Effect with commissions (at no extra cost to you). Thank you!
This week on my An American Attempts Foreign Recipes series, I’m taking a crack at Portugal’s most famous pastry: the pastel de nata!
I had never heard of pastéis de nata (“pastéis” is the plural of “pastel”) before visiting Lisbon and Porto last year. When I tried the custard tart on my first day in Lisbon, I was immediately hooked and surprised that, considering how beloved they are in Portugal, they are relatively difficult to find in America. In New York City and Newark I did end up finding special bakeries that sell them, but I really had to search them out. I have never noticed them anywhere else on my extensive travels throughout the States.
If you can’t get to Portugal anytime soon and would like to try the custard egg tarts in your home country, check out Solo Travel Story’s article on where to find pastéis de nata around the world. If you can get to Portugal, consider taking a pastel de nata making class so it will be easier to remember how to do it when you get home.
If Americans want to enjoy pastéis de nata at home and are not interested in having days-old pre-packaged natas sent by mail, the best option is to try to bake them ourselves. How hard could it be?
Pastel de Nata Recipe
I used the “Pastéis de Nata ~ Portuguese Custard Tarts” recipe from Leite’s Culinaria.
David Leite is a Portuguese-American three-time James Beard Award-winning food writer and cookbook author. I also watched Cupcake Jemma’s video demonstration since I had never made puff pastry from scratch before and wanted to make sure I was interpreting Leite’s directions correctly.

All of the various pastel de nata recipes I’ve read online have nearly identical ingredient lists. It seems that there isn’t much room to go wrong with your flavors – there’s always a ton of egg yolks, it’s almost always regular granulated sugar and not some fancy fine-grained baker’s sugar, etc. The only minor variation I saw was that some recipes call for lemon rind in the sugar syrup in addition to the cinnamon stick. One recipe called for corn flour in the custard; corn flour is a thickening agent so I suppose this could be a substitution in your pastel de nata recipe if you didn’t have enough eggs. Some recipes use a few of the egg whites in addition to the yolks, but this wouldn’t be traditional. The monks who invented pastéis de nata used their egg whites to starch their clothes, which is why they had to find a creative way to use the overabundance of leftover egg yolks.
Of course, we can’t know the true original recipe of the monks at Jerónimos Monastery because it is fiercely guarded by the pastry chefs who still make and sell them in Belém.
I’ll be honest (get your pitchforks ready) – I didn’t taste much of a difference between the pastel de nata I had at Pastéis de Belém, who have the original recipe, and the one I had in Lisbon’s Alfama neighborhood.
Hints for Fellow Americans
All of the ingredients used to make pastéis de nata are straightforward for American bakers; there is nothing on the ingredient list that you would need to order from a specialty shop. The only thing to be aware of is that if your grocery store sells little 3-4 inch cinnamon sticks, use two instead of just one.

The same cannot be said of the tools used for baking pastéis de nata, but we can make simple substitutions. Traditional pastéis de nata are baked in unique Portuguese egg tart tins, which seem to have wider, more sloped walls than muffin tins. They are also made of materials that can withstand high heat. Not owning this very specific tin shouldn’t hold you back though; muffin tins will do fine in a home baking environment.
More significant is the commercial kitchen vs. home baking dilemma. Traditional pastéis de nata are baked at an extremely high heat of approximately 800°F, but home ovens are lucky to reach 550°F. As a result, most recipes suggest scaling down the size of your tarts by using a mini muffin tin. Be sure not to use one with non-stick coating since such high temperatures can melt it; you can spray your tin with Pam instead. Leite recommends baking for only 9 minutes if taking his advice to use a mini tin, but notes that if you want to try a standard sized muffin tin, you would increase the baking time to 15-17 minutes. Other recipes said 10-12 minutes, or even kept it at 9 minutes despite using larger tins, which I thought was odd. I baked mine in mini tins for 9 minutes as advised and they turned out perfect, so I can’t imagine 9 minutes would also be sufficient for the large size.
Regardless of whether you go with mini or standard size, it will be difficult to get the characteristic blistering on the top of the nata without a commercial oven that reaches 800°F. The taste won’t suffer as a result, but if you really want to reproduce the right look with the blackened spots, you could try torching the top like you would with a crème brûlée, or broiling it briefly after baking.
Paul Hollywood says not to use a fan oven. I don’t even know what that means. I think it’s a European thing. A traditional American oven is therefore ideal, I guess.
Measurement Conversions
As far as the pastry dough, no adjustments need to be made for high altitude locations like Colorado. For the custard, when you’re making the sugar syrup, for every 1,000 feet above sea level, supposedly you should subtract 2°F. Altitude causes water to evaporate faster and the syrup can become gel-like more quickly.
Most of the pastel de nata recipes I’ve found give measurements in American units like cups rather than grams, so no conversions are necessary in that sense.
Results


The trickiest parts of making pastéis de nata from scratch were:
- While pressing the pastry dough into the muffin tins and trying to create a cup shape, I sometimes made the bottom too thin and gooey. When the finished tarts came out of the oven, the custard was soaking into some of the pastries and creating what Mary Berry would call a “soggy bottom”. Shaping them with warm fingers really softened the pastry too much and allowed layers of butter to melt out and create that sogginess; wetting my fingers with cold water as the recipe advises didn’t seem to help this issue. To prevent this, I think it would be a good idea to chill the finished, shaped pastry cups in the fridge or freezer for 20-30 minutes before pouring the custard into them.
- My candy thermometer wasn’t working very well, so I wasn’t 100% sure if I heated my sugar syrup past the recommended temperature. I was at 9000ft above sea level, so if the conversion rule is correct that I need to reduce the temperature by 2°F for every 1000ft, then I should have been aiming for 202°F instead of 220°F. I think I went past that by accident, but my syrup never coagulated at all and it seemed to turn out fine.
- I let the two dough logs chill overnight. The next morning, I tried my best to roll each log to 1 inch x 16 inches (step 13 on the recipe), which was very finicky because the ends were drier and thicker than the buttery, pliable middle. I think the ends picked up more flour and I hadn’t brushed off the excess well. I must have ultimately gotten them down to the correct length, though, because the first log gave me 21 pastries and the second log gave me 20. Leite’s recipe says it yields 40 pastries. If you are using 2 muffin tins with 12 molds per tin, you will have 3-4 empty molds per log. I had a ton of custard left over in the end.
- I didn’t have a pastry scraper and used a sharp-edged spatula instead. This was fine but not ideal; I can see why a wider pastry scraper would be beneficial for this recipe. The dough really is incredibly sticky.


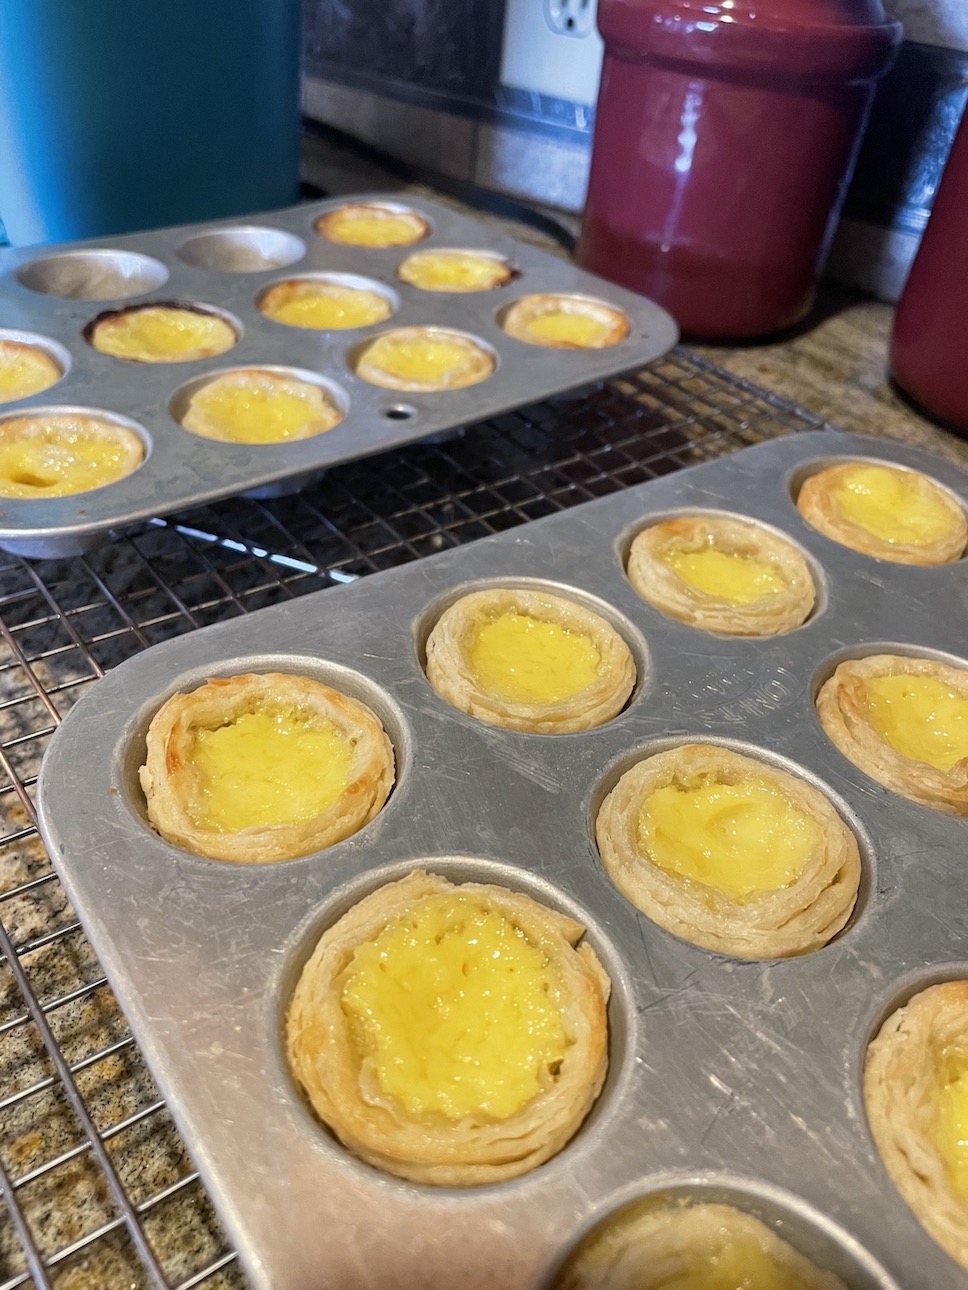
Otherwise, making pastéis de nata from scratch was so much easier than I expected! It was definitely the type of recipe that I needed to pay close attention to and focus on, but by following the recipe and video to a T, my natas turned out tasting just how I remembered them in Portugal. A couple of them were a little derpy looking, but I call it an overall win.
I learned that I really like the mini natas and might even prefer them to the traditional size. They have a great ratio of pastry to custard and feel like a little “amuse bouche” or afternoon tea-esque finger food. I’m not sure if that would be a blasphemous statement in Portugal, but at least they’re a hit at home.
I sort of wish I had used my second dough log to try making the large sized pastéis de nata, so I could experiment with how long they need to bake and compare whether they can be as successful as the mini natas despite the lack of heat. If I try that next time, I’ll report back!
The cool thing about pastéis de nata at-home recipes is that there really isn’t a barrier that makes them inaccessible for American bakers to try. Some dishes that are popular in other countries are difficult to duplicate in the States because it’s an ordeal to hunt down the proper ingredients, recipes don’t exist online in English, or it may require you to own a kitchen utensil that is rare for American households to have lying around. The pastel de nata can potentially be tricky for beginner bakers, but that is because the techniques are delicate, not because they’re Portuguese.
Have you ever baked pastéis de nata at home? How did it go? What are the main issues you ran into, if any? Did they measure up to the real deal? If you have any tips about the minor problems I ran into, drop ’em in the comments!
Related:


Pin It:


My dream is to write travel and hiking content full-time. All of my guides and itineraries are free and my travels are self-funded. If you enjoy my site and would like to support, you can donate any amount to my Ko-fi page. Thank you!!