
Car Camping: Toyota Tacoma Truck Bed Setup
Purchases made through some links on this page may provide The Detour Effect with commissions (at no extra cost to you). Thank you!
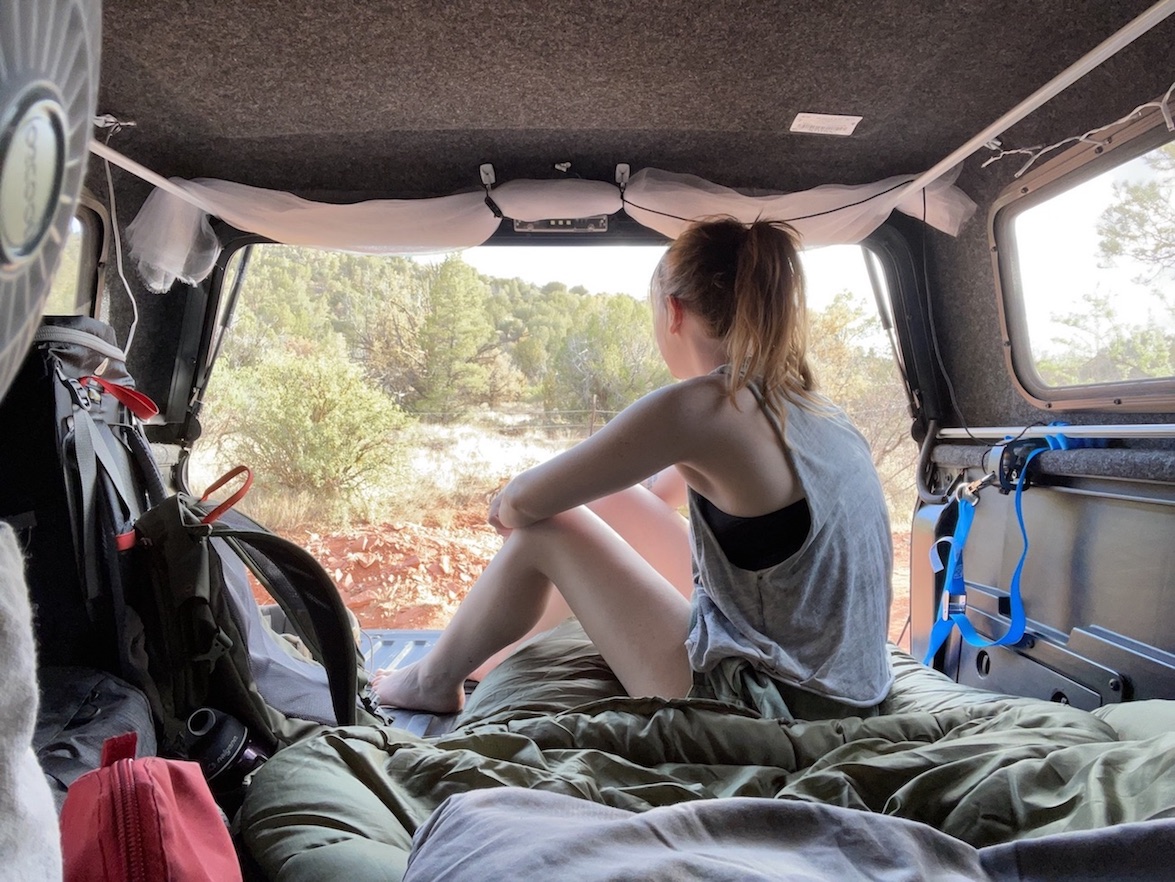
I truly believe my Toyota Tacoma truck topper setup is the cheapest and easiest do-it-yourself “build” on the internet, and I live in it for months at a time. The involved and expensive rigs you see posted elsewhere are not necessary (although they look fun!).
Since my job allows me to work remotely, one of my big plans since I started the gig back in 2019 was to pimp out the back of my Toyota Tacoma truck bed so that I can travel and work from the road. I finally went for it when pandemic lockdowns started to lift, and I’ve been nomadic ever since. You’ll find articles on my site about living in the truck while based in the Smoky Mountains, North Cascades, Guadalupe Mountains, Organ Mountains, and more.
You’ll need to know the details of my vehicle in order for this post to be useful. It’s a 2014 Toyota Tacoma with a 5-foot bed and an ARE truck cap.
I have no desire to buy a boxy, hulking van. They seem unwieldy and like they break down often, and my Tacoma is stealthy, four-wheel drive, and ready to handle any kind of terrain. It’s been a true adventure rig, even before the pimpage began. It’s gotten me through rough backcountry roads around the country. I like my truck. Why would I trade it? I’m also not someone who needs a lot of extra amenities, so an RV or van build is not necessary for me; at least not yet.
My initial plan was to test things out by using the truck on road trips for a few weeks here and there without having to ask for days off work, but always come back to Arizona as a base. I really enjoyed it and found that it’s not stressful to work from the road, so I ended up going full-time and dreaming up extra elements to build into the truck bed camper shell as I went along. This post will be updated periodically as I hone things.
There are sales going on for some of the gear listed below. I list the latest discounts here.

How to Work Remotely While Living Out of Your Car
First Step: Insulation
Truck Bed Liner
Before adding too many creative customizations, the first thing to think about is the actual base materials of the truck bed itself and whether this is going to keep you warm/cool/dry enough in different environments. Once you’ve already installed extra add-ons, it’s a pain in the ass to remove them in order to add insulation later.
I referenced an awesome website called Take The Truck, including this article where they talk about installing their own DIY truck bed liner. If you’ve ever slept in your car in any capacity, you know what they mean about condensation – your breath fogs up the windows and creates moisture quickly, which accumulates and can cause damage to your belongings and contribute a major gross-out factor.
My ARE truck topper already had a carpeted liner across the roof, which is amazing. It wasn’t necessary for me to do any DIY method for the topper itself. Regardless, the article got me asking other questions about insulation – what about the floor of the truck bed? What about the windows?
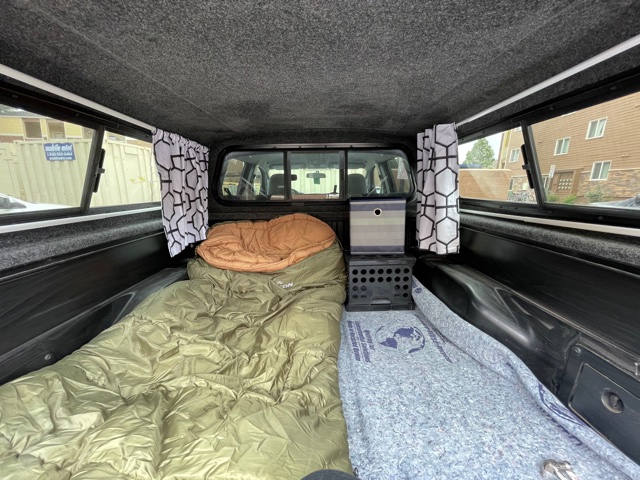
At first, I was trying to be as cheap as possible, so I just laid down some moving blankets across the floor. They’re thick and designed to be protective, and for moisture to roll off of them. However, every time I climbed into my truck, I felt like I had fiberglass burn or tiny hair splinters from the recycled material. I decided to remove the furniture blankets and considered replacing them with some kind of rug. I spent some time researching the best materials for outdoor rugs (apparently it’s polypropylene or polyester), but ultimately I decided investing in a BedRug would be a one-and-done purchase that would last me forever and be perfectly fitted to the dimensions of my truck. It cost $163 and arrived in the mail within 6 days of ordering. It only took about 15 minutes to install. What a difference it makes! Check out the before and after of installing the BedRug:

Curtains
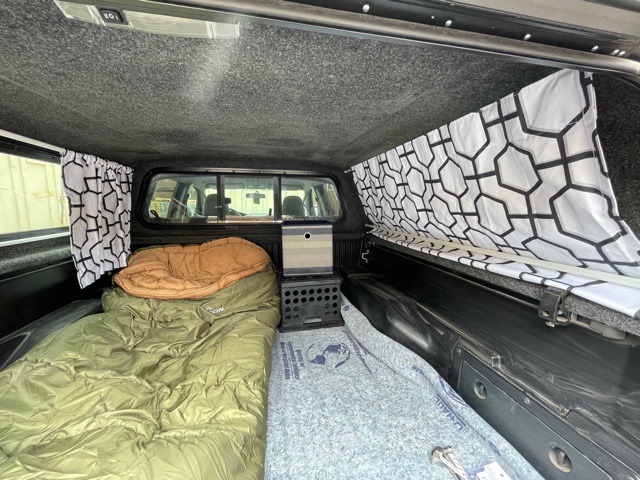
Installing curtains wasn’t just about privacy, but also about insulation. The folks over at Take The Truck made a good point that if you have tilted windows on your truck topper like I do and you let curtains hang down free, they may be less effective at protecting from the cold and they will also be all up in your space. I used Method 3 on their list of ways to install curtains so that I can keep them back and flattened up against the walls if I want to.
I bought four tension rods from Target for $8 each. The person who lived in my apartment before me had left behind these ugly white patterned curtains. I took them down and replaced them with my own at the time, but I never threw them out, so they came in handy for this project! I cut them up and hung them from two of the tension rods. I fixed the other two tension rods below the windows to serve as bars that I can tuck the bottom part of the curtains behind:
The rods do tend to fall down easily, so next came my genius Macgyver idea that I keep using in different capacities: the Hook-and-Velcro technique.
Materials for the Hook-and-Velcro Technique (Coined By Yours Truly):

VELCRO Brand Extreme Tape Strips | 4 x 2 Inch 2 Sets | Holds 15 lbs | Heavy Duty Black with Stick on Adhesive | Strong Holding Power for Outdoor Use

Command Small Wire Toggle Hooks, Damage Free Hanging Wall Hooks with Adhesive Strips, No Tools Wall Hooks for Hanging Organizational Items in Living Spaces
Ta-da! What more do you need? Just buy some of these cheap Command wall hooks, but instead of using the sticky adhesive that comes with it, buy strips of Velcro, cut them up, and fix that to the back of the hooks instead. The Velcro sticks to the carpeting material on the ceiling and sides of the truck topper (if you are using another material for insulation, you may need something other than Velcro).

I stuck these hooks on either end of each rod as a backup method of holding them in place, in case the tension mechanism of the rod wasn’t going to be enough (it wasn’t). It’s also been helpful for me to lodge the ends of the rods on top of the plastic borders around the windows. In this photo you’ll notice that the rods are wedged this way in the upper corner.
Reflectix

I use Reflectix foam privacy board to cover the rear window of the truck and the rear window of the cap. This material is great for regulating heat and it can be easily cut or bent, so I cut it to the shape of my windows. When I want to put it up at night for some privacy or stealth, I clip it to the window frames using simple binder clips. When I don’t want it up – so that I can see while I’m driving! – I just roll them up tight and shove them in a storage box.
Second Step: Lighting

The cap came with a dome light already attached, which is battery operated.
I also wanted to cozy things up and decided to hang string lights. They sell solar-powered and USB-powered string lights, but I went with battery-operated because I don’t want to have to ever take them down in order to charge them in the sun and then rehang them again, and I don’t want to rely on having enough charge in a power bank (I’d rather use a power bank to charge more important things like cell phone, laptop, GPS, etc). I bought battery powered outdoor string lights on that same Target spree for $8 (something like this also looks cool). I would have preferred them in black to match my truck cap, but they only had white in stock. Some companies like MPOWERD and Revel make string lights specifically for camping.
The length is perfect because it covers three out of four of the walls; I don’t want the lights hanging down at the foot/opening side of the truck cap, which is most likely to come in contact with weather, the opening and closing of the window, and other issues that might break the lights. I also planned on installing a bug net on the back wall and didn’t want lights in the way.


I used the same Hook-and-Velcro© strategy to hang the lights, which has been all that’s necessary to keep them up.

I already have a bunch of different flashlights for hiking and a headlamp as well, so those make good backups. Finally, my friend @ChelseaBabbitt, who has done some car camping/working remotely too, recommended solar-powered Luci Lanterns. They are inflatable, so they pack down nice and small when not needed (or when you want to throw one on your dashboard for solar charging), and they also can be quick-charged via USB. They have multiple different products at a range of price points, the cheapest being around $25 currently, and the most expensive at $55. I got the mid-range $40 one that can also be used as a power bank to charge your phone with.
Check out a video demonstration of all my lights in action!
Third Step: Safety
Locking System

The back door at the foot of my truck bed locks the same way the car itself locks, but the window on the upper half of the cap only locks from the outside. From inside the truck, you can turn the levers closed, but they could easily be reopened from the outside again. I Googled solutions, and there are some creative ones out there (I like this guy’s vice grips idea, but my topper doesn’t have a straight bar to attach it to), but ultimately I took a hint from the contributors on the TacomaWorld truck camping forums and decided to create a way to tether the window to the floor. Most people say to just latch chains or bungee cords to the back of the window and then to the metal loops on the floor of the truck bed. I thought bungee cords might not be strong enough, and I couldn’t find chains the right length, so I went with lashing straps and swivel hooks.
They can easily be unlatched and readjusted when not needed, and they’re meant to handle loads of extreme weight and resistance. A pack of two straps costs $4.47 at Walmart and the swivel hooks were $3.64 per hook, though I retrospect I don’t know why I thought the swivel hooks needed to be involved. I can achieve the same thing using the lashing straps alone.
FYI I also carry multiple weapons so don’t come at me.

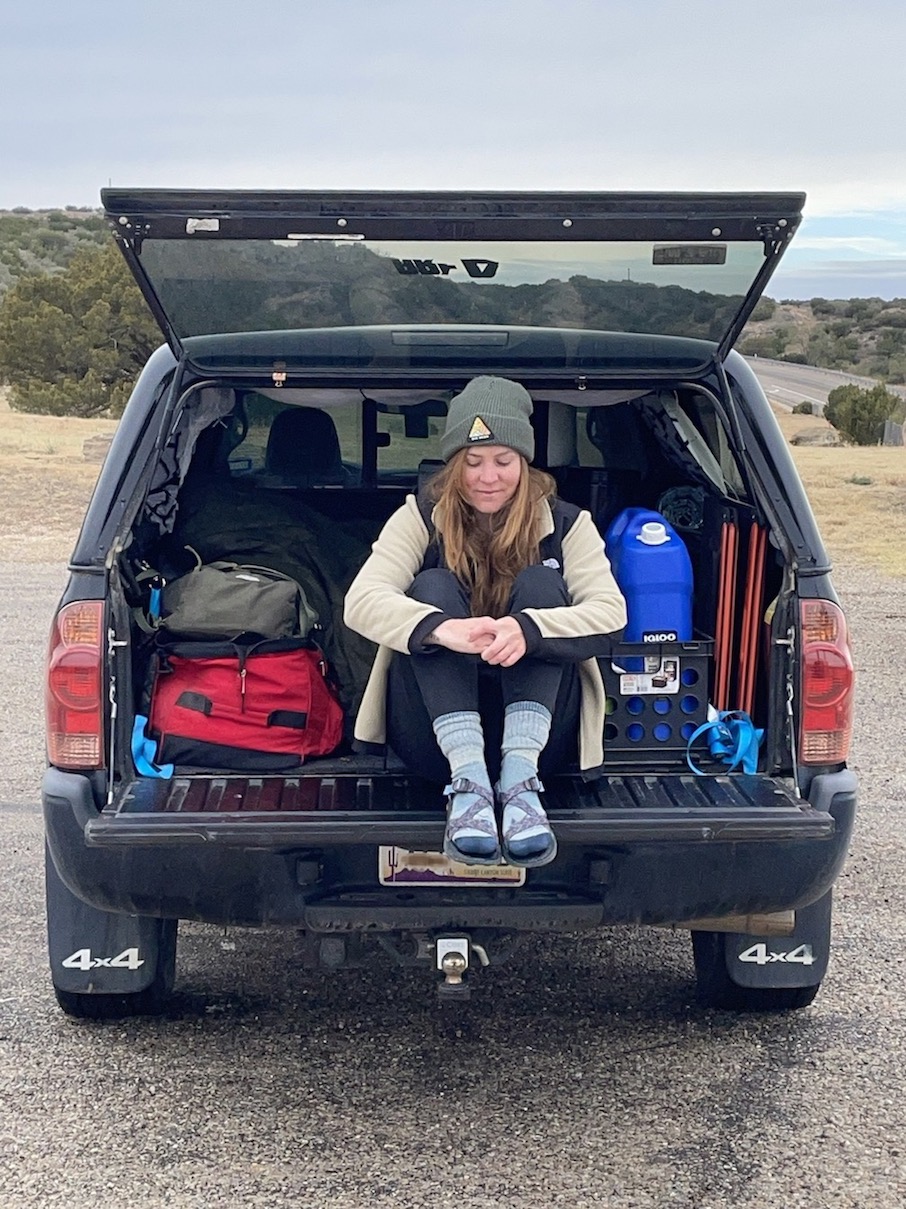
Water
@DirtbagHikerBlg gave me a pro-tip on Twitter that regular plastic water bottles can cause fires if left out in your car! I don’t typically buy plastic water bottles; when I hike I carry Nalgene bottles which are reusable and extremely leak-proof. But one time I misjudged how much water I should bring for a trip and I ended up needing to stop at a gas station to buy two big one-liter plastic Dasani bottles of water. For the past year I kept those bottles in my car as a backup water supply and have refilled them periodically. But the fire possibility is a real thing, it turns out, so I finally trashed those and bought a six gallon water jug from Walmart for $14.77.
Fourth Step: Comfort
Bug Net
@JamesGoesOutdoors suggested on Instagram that I install a bug net. What a great idea! If I hadn’t done this, I’m sure I would have sealed myself up inside the truck on steaming hot days just to avoid bugs. I’d much rather let some air come through.
I ordered bug netting off Amazon for $9.14 (after tax and shipping), cut it to the appropriate length x width, and attached Velcro to each end in order to fix it to the truck cap. I tied paracord to two Command hooks so that when I roll the bug netting up, I can tie it in place and out of the way. When I undo the paracord, it will fall free over the back opening:


Fan

Chelsea also recommended getting a battery-powered fan. For some reason I’d been thinking about a regular or USB fan and trying to decide how best to deal with plugging it in, so I’m glad she smacked some sense into me and reminded me that battery-powered ones exist. I bought a cheapie at Target which I regret, though; it’s barely a whisper. It did really make me feel better during a recent 97 degree Sedona, Arizona trip, but I’m sure I’ll upgrade to a more expensive one at some point.
Someone in one of my car living Facebook groups recently recommended the portable Arctic Air conditioning unit, which seems like a true blessing if it actually works.
Luggable Loo
I’ve always been fine with going in the woods or at rest stops, but when you’re car camping for longer periods, there may come a time…
I ultimately got a Luggable Loo, which is just a bucket with a toilet seat lid on it. You can create your own bucket + lid situation if buying one seems ridiculous. However, the Doodie Bags you can buy to go with a Luggable Loo are paramount. There are compounds in the bags that are supposed to break down waste: “Inner bags are pre-filled with Bio-Gel waste gelatin powder that solidifies liquid waste and masks unpleasant odors.”
I am only worried about disposal. Apparently Moab has recently asked people to stop disposing of wag bags in regular trash cans, because they explode on garbage men, which would be funny if it wasn’t so horrific!
Coleman 2-Burner Stove
In the past I’ve mainly relied on my MSR Pocket Rocket camp stove and fuel canister. As someone who doesn’t care much about cooking, this does the trick for basics like coffee, oatmeal, or ramen noodles. While backpacking I rarely pack any stove at all.


I tend to pack foods that are going to be non-perishable when I car camp, things I can just lock up in a bear canister, because I don’t want to deal with a cooler, ice, trying to figure out how to wash dishes, trying to figure out how to keep the cooking scent out of my car so I don’t attract animals, and all the food-related rituals that add an extra layer of fuss. I can live off of protein bars, bread, and peanut butter for a pretty long time. I particularly relate to this article by Nicholas J. Devlin called “7 Reasons Why Cooking on Trail is Overrated“.
But living on the road is like, an extra long time. I start to get sick of grains and cereals and carbs, which causes me to spend too much money eating at restaurants to get my nutrients in. So I caved. I finally bought a cooler and some ice packs so I can hoard vegetables and other real food. After upgrading to a Coleman 2-burner Portable Camp Stove, I’ve recently been trying to make scrambles, pancakes, rice dishes, and tacos. I need to look up backcountry cooking recipes (maybe via Backcountry Foodie).
Folding Stool
If I sit on any kind of stool or chair in the truck, my head hits the ceiling. Instead I sit on the ground and have my laptop in my lap. Sometimes I bunch up my sleeping bag in a pile so it becomes sort of like a beanbag chair, and I can sit on that to work. I’ll also put my laptop on top of my bear canister when I need a little work station.
In Moab I found this tiny $10 folding stool at a gas station. The heavens opened up as light shone down upon it. It’s still too tall to use as a chair, sadly, but I can put my laptop on it for extra comfort, or just use it as a table. When not needed I can fold and stash it aside, unlike the bear can. Sometimes it’s the little things that make the biggest difference!
Something like this looks pretty similar to what I have.


Working Remotely
Wifi
I bought a Verizon Mifi 8800L Jetpack for $200, plus a 15GB for $10 per month high speed plan (I later needed to increase to the 30GB per month plan). Prior to choosing a campsite to work from, I check the signal on Verizon’s coverage map and I read reviews of the campsite on The Dyrt. I wrote in depth about this in my post How to Work Remotely While Living in a Car.


Sign up for a 7-day free trial of The Dyrt PRO to find both paid and free campsites with good cell signal for working remotely from your truck camper. You can have access to some features for free, but PRO allows offline access, plus more advanced search functionality and map layers.
Electricity
When I first began working and living out of my truck, I just had a NOCO Boost Plus GB40 1000 Amp Jump Starter Power Bank. This device can be used to jump start your car so you don’t have to wait for someone else to come along and help, and it is also a power bank that can charge your laptop and cell phone devices (Note: it may not be compatible to charge older laptops that require a wall charger rather than USB or USB-C). @Tomttake2 recommended the Aickar jump starter to me and basically introduced me to this whole concept, but I believe that company is now called Moock, and perhaps the name change is why NOCO has pulled ahead in brand recognition/ratings recently.

I also tried a GoalZero Sherpa power bank because it’s affordable and I thought it would be small enough to use in both car camping and multi-day backpacking settings, aka two birds one stone. That was a bust. Finally I’ve stepped up and am using a Jackery Portable Power Station. The first time I charged my laptop with it, it brought the battery up from 10% to 100% without hardly making a dent in the Jackery’s own battery life. It’s a keeper! With solar panels (and not-so-cloudy weather), you can be out camping and away from civilization indefinitely and will still be able to recharge your Jackery. Or, charging it via a typical wall outlet should last you a few recharges of a laptop for a shorter camping trip. The amount of recharges you’ll get depends on whether you buy the Jackery 250, Jackery 500, Jackery 1000, etc.
Using the Jackery and solar panels, I’ve been able to squat at Bureau of Land Management campsites for free for weeks at a time and still clock in for work without issue.
Optional Additions
This project is still in progress! I might add the following:
- A cooler that can be recharged by my cigarette lighter or 12v. I’ve never worried about trying to pack frozen foods, but after a recent hot car-camping day in the desert, I’m now thinking that having ice packs on hand is a good idea to help me cool down if needed, and at that rate I might as well also start branching out into packing more varied types of travel food. This could also be a good place to store my fuel canister, since I worry about leaving it out in 95+ degree heat.
- Mattress foam (or something else?) for under my sleeping bag. I have my backpacking sleeping bag which is lightweight, the Nemo Azura 20. Separately for car camping, I have the zero-degree Teton Sports Celsius XL Sleeping Bag, which is massive and extremely poofy. I bought this when I was living in Minturn, Colorado working at a hostel and a ski resort, as I would sleep in my car sometimes in the winter. Usually it’s comfortable enough to just lay on top of this bag, but every once in while I cramp up. I go back and forth on this one. Mattress foam would be one more thing to worry about storing somehow when not in use.
Extras I Intentionally Did Not Add
- Sleeping platform. My truck bed is only 5 feet, so I have to sleep diagonally. A lot of people recommend building a platform so that you can get your body off the cold floor, and also so you can store stuff underneath. I don’t think the floor temperature of my truck is going to be a big problem since I bought the BedRug and I also have the zero degree bag. And, if I build a platform length-wise, my legs will have to hang off it since I can’t stretch out that direction. If you do want to build a platform but your truck bed is short, you might consider one of the build ideas in the gallery below. You won’t be able to simply buy a camp cot or other regular furniture/mattress, because most things are built to be at least 75 inches long and won’t fit in a 5 foot truck bed. You’ll have to do some kind of custom build. Keep in mind some people advise against wood because it could rot, so be sure to prime it, or check out the PVC pipe alternative below.
*Update – Pacific Adventure Works now appears to make a sleeping platform that is actually adjustable to fit any length! I also found this new REI Trailgate Vehicle Sleeping Platform, but I can’t quite figure out if you’re stuck with the 72 inch length? It does say it can be “partially deployed, in-half.” The reviews are hit or miss. There is also this new product called the Hele Box; in summer 2024, they said, “It can adjust to a shorter length, but it’s a really tight fit – we are releasing a shorter version later this year!”
(I don’t own these pictures, I found them on the internet. One is from Take The Truck, one is from Pinterest, and one is from TacomaWorld).


- A truck bed tent. I like the idea of remaining stealthy, contained, and lockable, and no-one being able to tell from the outside that a person might be in there. I prefer a topper/cap/camper shell to a tent or camper.
- Shower system. I can pour water from the jug to wash my hands or do an anti-bacterial wipe scrub-down, but ultimately I think I’ll have enough access to gyms, public campsite showers, or private hotel showers here and there. And if I don’t, I don’t really care lol. It’s called camping. *Update – something more extensive is going to be necessary for washing dishes. The Rinse Kit seems awesome.
Have you found during your car camping adventures that some things you never thought of at the outset ended up being extremely important? I love hearing stories about how people have solved their car-living problems through trial and error. Get out there and get creative – and report back!
Pin It:

Related Posts:


My dream is to write travel and hiking content full-time. All of my guides and itineraries are free and my travels are self-funded. If you enjoy my site and would like to support, you can donate any amount to my Ko-fi page. Thank you!!
Just terrific. I’m thinking about removing my Ruffland dog crates and setting up my trusty 2003 Tacoma for some road trips. Just turned 70 and feeling ready. Thank you for sharing this with us. Inspiring!
I’m constantly impressed by the insightful and practical tips shared on your blog. Keep up the fantastic work ! Rope string lights add a whimsical touch to any outdoor space, creating a cozy and inviting atmosphere. Your blog showcases their charm perfectly!
My husband and I drive a Tundra with a 5.5′ bed and just ordered our Moonlander cap from Radica. These cool people have designed camper shells with a bed platform that allows sleeping left to right across your truck bed rather than front to back.
Oh that sounds awesome, and will save space so you can use the rest of the length for storage! I’m glad there’s enough of a market that companies keep coming up with more convenient ways to cater to car campers. Every year something comes out that solves one of my problems. I hope you guys have a blast with your new topper!
I’ve always been a tiny house fan and lived out of my Ford Sport Trac years ago (not the bed) but recently purchased a 6’ bed Tacoma and drive it to work. I often sit in my bed at lunch and take naps and dream of how I could make or utilize a truck camper out of it. Thanks for sharing your journey and the ideas learned!
I’m fighting the moisture problem with my 2013toyota Tacoma I’ve got the hole bed lined with emergency blankets except for a window but I still get moisture how would you stop that from building up and causing a problem I’m spending more then I care to say on laundry because of the moisture
Dang that sounds frustrating. To be honest I haven’t really struggled with moisture, maybe because the Bedrug material doesn’t hold water? If you don’t have a Bedrug you might look into spray-on liners instead, that’s supposed to help with moisture and you can buy different brands at Home Depot or Walmart. Good luck!
insulation and carpet that’s the way to go to get that condensation gone My ARE camper shell head carpet in the top of it it also has a little bit of a rise section so that that difference in the air volume helps me from keeping it too wet when I sleep in in the cold cold winter
I absolutely love how simple and effective your setup is. I’ve got a 5 foot bed Nissan Frontier and I need to make a platform for it. You mentioned you have to sleep diagonally, do you have any sort of build for that or do you just use a foam mattress diagonally across the bed? I know you’re in France now but I can’t wait for more updates!
Thanks so much for reading, I hope the build process is going well with your Nissan! I just use a really puffy winter sleeping bag and I lay it diagonally across the floor, no platform or foam. It’s pretty thick so it already feels padded enough for me. Maybe one day it will sort of deflate though lol, and then I’ll need another solution.
The build is going well! I made a platform since I haven’t committed to a BedRug yet and wanted to be able to store things in the truck with me but still be out of the way. I used Reflectix for all the windows and cut them to size, then put Velcro on them and the shell so they stay up easily. Next on the list is fairy lights, which I’m going to hot glue to the ceiling of the cap (I don’t have carpet on mine) and then the mosquito net. And some mattress foam. I’m basically copying your build because it’s simple and solves all the problems I have!
That’s so awesome to hear, I can’t wait for you to try it all out on the road! It’s very satisfying to put it all in practice. Good idea about the lights; sometimes I think of stapling mine into the carpeting because the command hooks fall every once in awhile
This is amazing. Do you have a full video tour (my brain receives images so much better than words.) I built a platform last summer for my truck bed, I bought these two camping pads: I am not sure if the link will post, but they’re memory foam. The kids size, fits almost perfect in my Tacoma (5ft bed) we got two and on the platform it’s a game changer for comfort. I am thinking I need to reseal my ARE cap because the condensation accumulated an awful lot. Even though the top is insulated and I have a bottom mat in the bed (similar to a horse stall material.. incredibly heavy) but the bedrug may be a compete game changer. Thank you so much for this and taking the time to link everything.
https://www.walmart.com/ip/12749120818?sid=3B299C96-67CA-44CA-96E7-DA92CEF424BB
Thanks Justina! The link worked, the memory foam mattress looks extremely comfy! Awesome that it’s the right size, and that’s convenient that it rolls up so you can make room during the day. I hope other readers take a look at the comments and check it out.
I might have posted a video tour on Instagram or TikTok way back in the day, to be honest I don’t really remember lol. I haven’t been posting anywhere much lately. Hope to get back at it this summer!
Nice! I decked out the back of my ford ranger for camping on an extended road trip I took through six states. The velcro for the curtains can’t be beat! Your setup looks much nicer than minever though, great job! To secure the back window from the inside on mine I drilled a small hole through the inside flange where the handle comes through. I can put a nail through the hole and it prevents the handle from turning. Instead of having so many battery operated devices I also installed a 60 watt solar panel on the roof with a charge controller and 2 deep cycle car batteries for power. I can power all my small stuff for 5 days with no sun indefinitely when the sun is out. But that might be more than you would need. I also took two 5 foot poles, a 6×8 foot tarp, some rope and tent stakes to make a kind of porch of the back of my truck but could still close and lock the camper at night. That made it really nice on rainy mornings to be able to get out and have a place to move without getting wet. Just some thoughts. You’ve done an amazing job!
Hey Dave, that’s an awesome idea about the nail! Would be much less of a hassle; on my recent trip I went into a panic because one time I couldn’t get the swivel hook to unlock, it was stuck lol. Finally got it obviously, but thought I was going to lock myself in!
I think getting a solar panel is going to be a solid upgrade for me. One of my charging devices didn’t work very well (GoalZero Sherpa) so the more backup options I have the better. I’m not familiar with how solar panels work yet though, never messed around with them; I’ll have to read up on how you would connect to the deep cycle batteries.
An awning of some kind would be nice too! These are great tips, thank you!
I really enjoyed reading about your truck transformation. You used so many clever ideas. I sometimes sleep in the back of my SUV so some of these ideas are handy.
As always, the amount of research and detail you include is SO helpful. What a smart idea to use velcro with a command strip to secure things to the topper! Can’t wait to hear how you like being on the road for longer periods.
This is so great! My sister is starting to get into car campaing and she just made curtains for her car. I’m going to pass this blog post along to her for additional inspiration. I like your string lights 🙂
Thanks, I hope it’s helpful to her! Let me know if she implements anything cool!
Wow! This is awesome! I love how comfy and safe it looks. My husband has been wanting to get a new truck so that we can use it for our camping trips so I’m sure he’ll love this idea. So fun!
A truck feels like the best of both worlds, more discreet than other adventure rigs and more capable. If you guys do get a truck I hope you have a blast with it!
I am so excited for your new Vanlife Claire! I hope it works well and we can tempt you up North to visit at some point. 🙂
I have watched about a zillion van life conversion videos on youtube, so I love to see how you have chose to tackle this. Those curtains may be ugly for a home, but they sort of suit your van! I really like them in this setup! I am a huge fan of the comfort ideas, the cozy fairy lights, the fan and the bug net.
You are going to have such a blast!
Thanks Josy!! I was thinking of coming to Canada on my road trip that I’ve been planning this summer, but every 5 seconds I have to remind myself about the border still being closed lol. Hopefully not for long, fingers crossed!
Sounds like such a fun experience! With the current situation I’m also more and more thinking in this direction. Love the cozy end result 🙂
Thanks Tjasa! It does feel pretty cozy so far. I’m definitely hoping international borders open up more and more, but if not/until then I’ll be excited to cruise the States in style
Ah what a fun thing to do! I can’t believe how cozy the end result looks! I’d love to be able to work remotely and travel! Vanlife looks so much fun! Thanks for sharing this great guide to converting your truck, it was a really interesting read!
Thanks Hannah, it’s been a fun project! It’ll be interesting to find out how sustainable working from the road turns out to be lol. Might have to get crafty with wifi, we shall see
Super-useful stuff for anyone wanting to get out in the sticks and have a little bit of home comfort when you get back from hiking !
Thanks Bob!! I hope that turns out to be true; I’m thinking with this extra layer of comfort, I’ll have more stamina to stay out and about for longer and longer trips!